
The OpenDrop V4 digital microfluidics platform is equipped with a powerful ARM Cortex M0 processor, a OLED display, joystick and buttons to control the droplets on the array. The OpenDrop is per-programmed with embedded code to test the device by use of the onboard joystick. There is also an open source PC software available that allows easy control of complex sequences. For your own developments the device can be reprogrammed via the USB-C connector using the Arduino integrated development environment (IDE).
Embedded Software
The OpenDrop device is ready out of the box for first experiments. After connecting the device via the USB-C cable and inserting a cartridge, droplets can be moved using the built in joystick. No computer or programming is needed. The OLED display shows the position of the activated electrode as well as coordinates and voltage levels. Voltage levels can be adjusted in an onboard menu.

For updating the embedded software see instructions (Uploading code to the OpenDrop V4) below.
PC-Control-Software (OpenDropController)
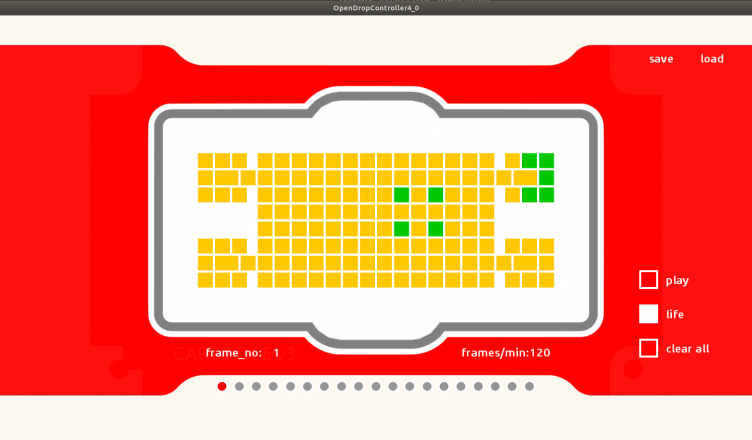
The new control software “OpenDropCpntroller” allows to control the OpenDrop from a PC. On a simple graphical interface electrodes can be switched on and off through a simple mouse click. Sequences of patterns can be generated and played automatically.
Controls:
Click the electrode to activate or deactivate.
Use left and right button or the mouse wheel to move to the next frame.
Shift click to activate an electrode and move to the next frame automatically.
When button life is activated the device is updated with the software.
Hit the play button to run the sequence. While playing the speed can be changes with the mouse wheel.
Press save to save the current sequence to a json file on disk.
Load restores a sequence from disk. Delete the sequence before loading a new one.
Hit clear all to delete the whole sequence.
Use the button reconnect to renew the connect to the device after unplug or reset.
Installing the PC-Software (OpenDropController)
The OpenDrop PC-Software is programmed in Processing (processing.org). Processing is a flexible software sketchbook and a language ideal for learning and prototyping.
To install, download the newest version of Processing here: https://processing.org/download/
Then run the OpenDropController from the OpenDrop GitHub repository
Download the OpenDrop repository from GitHub:
https://github.com/GaudiLabs/OpenDrop/archive/master.zip
For the OpenDropController to connect to the device you may need to install the USB-Serial drivers. For this just install the Arduino IDE as shown in the instructions below.
Uploading code to the OpenDrop V4
OpenDrop V4 is controlled by a ATSAMD21G18 ARM Cortex M0 processor with a “Adafruit Feather M0” compatible bootloader.
See Adafruit Feather M0 instructions here:
https://learn.adafruit.com/adafruit-feather-m0-basic-proto/
To upload your own code to the OpenDrop you first need to download the latest release of the Arduino IDE.
Then add “https://adafruit.github.io/arduino-board-index/package_adafruit_index.json” to “Additional Boards Manager URLs” option in the preference menu.
See instructions here:
https://learn.adafruit.com/adafruit-feather-m0-basic-proto/setup
Now install “Arduino SAMD” and “Adafruit SAMD” the Boards Manager.
See instructions here:
https://learn.adafruit.com/adafruit-feather-m0-basic-proto/using-with-arduino-ide
Quit and reopen the Arduino IDE. Then select “Feather M0” from the “Tools->Board menu”
Download the OpenDrop repository from GitHub
https://github.com/GaudiLabs/OpenDrop/archive/master.zip
Now install all the libraries from the folder “OpenDropV4/Software/Libraries/” into your Arduino IDE using the Library Manager
See instructions here:
https://www.arduino.cc/en/Guide/Libraries
Then open the sketch (code) that you want to upload to the OpenDrop.
Preinstalled code from the OpenDrop repository:
https://github.com/GaudiLabs/OpenDrop/tree/master/OpenDropV4/Software
Plug in the OpenDrop to you computer using the USB-C cable, choose the “Feather M0” device from the “Port” menu. Then start “Sketch->Upload”
Writing your own code:
Commands implemented so far:
OpenDrop class:
Create a new instance of OpenDrop device.
Example: OpenDrop OpenDropDevice = OpenDrop();
Drop *getDrop();
Create a new drop on the device.
Example: Drop *myDrop = OpenDropDevice.getDrop();
void begin(uint16_t freq = 1600);
Initialize OpenDrop device.
Example: OpenDropDevice.begin();
bool run(void);
void update(void);
Refresh device
Example: OpenDropDevice.update();
void set_Fluxels(bool fluxels_array[][8]);
void update_Display(void);
Refresh the display
Example: OpenDropDevice.update_Display();
void update_Drops(void);
Update the droplets on OpenDrop
Example: OpenDropDevice.update_Drops();
void drive_Fluxels(void);
Drive the electrodes according to the droplet positions
Example: OpenDropDevice.drive_Fluxels();
void read_Fluxels(void);
read all the droplet positions through the feedback amplifier
Example: OpenDropDevice.read_Fluxels();
void set_joy(uint8_t x,uint8_t y);
void show_joy(boolean val);
Show/hide the cursor on the display.
Example: OpenDropDevice.show_joy(true);
void set_voltage(uint16_t voltage, bool AC_on,uint16_t frequence);
Set voltage level, AC/DC and frequency:
Example: OpenDropDevice.set_voltage(240,false,1000);
void setPin(uint8_t pin, boolean val);
Drop class:
void(begin(int x,int y));
Initialize a drop with possition x, y:
Example: myDrop->begin(x,y);
void(move_right());
void(move_left());
void(move_up());
void(move_down());
Move dropplets
Example: myDrop->move_right();
void(go(int x,int y));
int position_x();
int position_y();
Get position of drop
int goal_x();
int goal_y();
int next_x();
int next_y();
int num();
bool is_moving();
Processor:
ATSAMD21G18 @ 48MHz with 3.3V logic/power
256KB of FLASH + 32KB of RAM
32.768 KHz crystal for clock generation & RTC