

OpenTheremin MIDI implementation on V3

 It's finally done! We have a true and clean MIDI implementation for the Open.Theremin! While the Open.Theremin has it's own sound generator and can be played as stand alone instrument the MIDI software allows you to connect your theremin to any MIDI device or various MIDI synthesizers installed on you computer. This largely extend the functionality and is just great fun to play.
The following MIDI implementation and instructions for Open.Theremin V3 were developed by Vincent Dhamelincourt. Vincent is an experienced electronics and firmware engineer from Lunel, France. He plays keyboards and theremin in a local band. *** A great thank you! ***
Installation:
Download and install the arduino code from the following git repository and carefully read the instruction below. I recommend to first setup and test the theremin as described in the instruction that came with the theremin (using built in sound generator) and then move to MIDI.
To install:
- Download the Theremin MIDI code from https://github.com/MrDham/OpenTheremin_V3_with_MIDI
- Open up the Arduino IDE
- Open the File "Open_Theremin_V3.ino"
- In "Application.cpp", take care of selecting MIDI mode that corresponds to your situation (put "//" in front off inadequate line -
MIDI through serial is selected by default here):
Serial.begin(115200); // Baudrate for midi to serial. Use a serial to midi router http://projectgus.github.com/hairless-midiserial/
//Serial.begin(31250); // Baudrate for real midi. Use din connection https://www.arduino.cc/en/Tutorial/Midi or HIDUINO https://github.com/ddiakopoulos/hiduino
I tested "Hiduino" and "MIDI to serial" modes, both are OK. - Selecting the correct usb port on Tools -> Serial Port
- Select the correct arduino board from Tools -> Board
- Upload the code by clicking on the upload button.
MIDI synthesizer on the computer
OpenTheremin MIDI is sending at 115200 baud through USB serial.
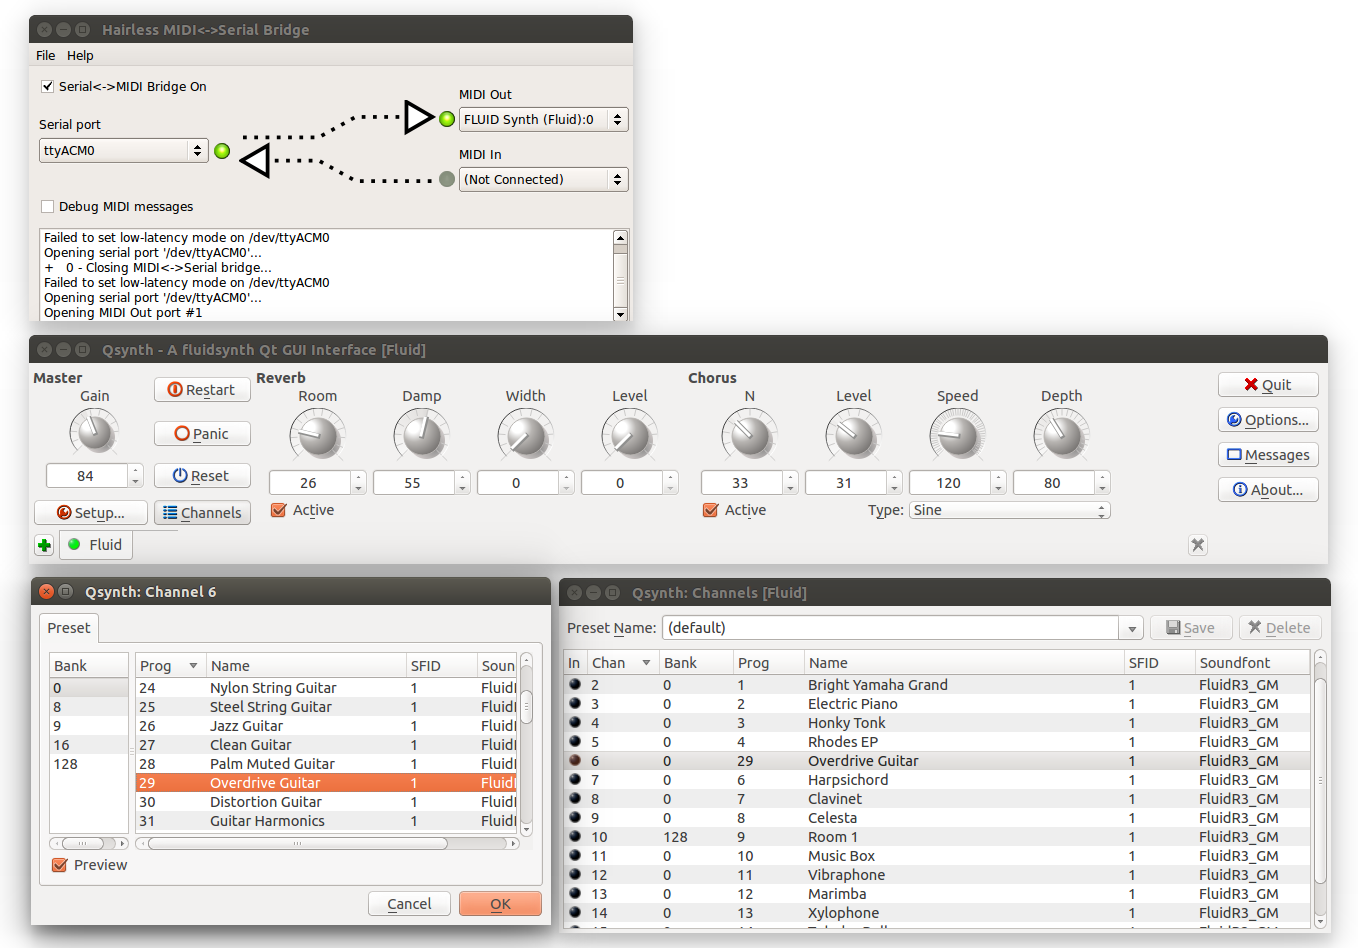
Use a serial to MIDI router on your computer such as "hairless-midiserial" (http://projectgus.github.com/hairless-midiserial/)
And to generate sound from the MIDI signal use a software MIDI synthesizer such as Gforce's Minimonsta (commercial), Minimogue VA or QSynth (free).
Real DIN MIDI interface
You can also use the OpenTheremin MIDI implemented to communicate with a real MIDI device.

To do so add a DIN connection. See here (https://www.arduino.cc/en/Tutorial/Midi) for the hardware required.
Set the baud rate to 31250 by changing Serial.begin(115200); to Serial.begin(31250); in the code (-> application.cpp -> midi_setup() )
USB-MIDI (HID) device
Through the code provided in the HIDUINO project the Open.Theremin MIDI implemented can be turned into a class-compliant USB-MIDI device. HIDUINO takes advantage of the ATmega (8u2/16u2) chip on the Arduino UNO. So you get a true USB-MIDI device for plug-and-play compatibility on Windows, OSX, and Linux - just like a commercial MIDI controller. Code and documentation can be found here (https://github.com/ddiakopoulos/hiduino).
Implementation:
The MIDI open theremin generates NOTE ON/OFF messages and Continuous Controler changes (MIDI CC) depending on settings and hands positions next to antennas.
NOTE ON/OFF:
In MIDI standard NOTE ON/OFF messages have a NOTE NUMBER and a VELOCITY.
Let's consider a Fade-in / Pitch Variation / Fade-out sequence (I use right handed convention):
- Fade-In
When left hand moves away from VOLUME ANTENNA (LOOP) and volume crosses a settable threshold (Volume trigger), a NOTE ON is generated. VELOCITY depends on how fast left hand is moving. Right hand's position next to PITCH ANTENNA (ROD) determines the starting NOTE NUMBER. - Pitch variation
When right hand moves next to PITCH ANTENNA (ROD), PITCH BEND messages are generated (if activated) to reach exact pitch as long as pitch bend range will do. Beyond, a new NOTE ON followed by a NOTE OFF for the previous note are generated if legato mode is activated. Pitch bend range can be configured (1, 2, 7, 12 or 24 semitones) to align with synth's maximum capabilities. - Fade-Out
When left hand moves close to VOLUME ANTENNA (LOOP) and volume goes under Volume trigger threshold, a NOTE OFF is generated to mute the playing note.
MIDI Continuous Controllers (MIDI CCs):
It is possible to assign independent MIDI CCs to the PITCH ANTENNA (ROD) and to the VOLUME ANTENNA (LOOP).
Configuration:
There is two calibration mode. Best use a speaker connected to the theremin to verify calibration and timbre variation.
Normal calibration of antennas: turn REGISTER POT counter clockwise (all left) and press button for 3 seconds -> Runs normal calibration of antennas (yellow LED blinks until finished). Audio processing from antennas to output jack, including volume and pitch pots, LEDs and button functions, is exactly the same as in open theremin V3. You can play the Audio and the MIDI side by side.
MIDI configuration:
REGISTER pot becomes "SELECT PARAMETER"
TIMBRE pot becomes "PARAMETER VALUE"
To change the settings, select a Parameter from the list below and move "Parameter's Value" to change corresponding setting:
- Register: 4 positions as in original Open Theremin V3
- Timbre: 8 positions as in original Open Theremin V3
- Channel: 16 positions (channel 1 to 16)
- Rod antenna mode: 4 positions (Legato off/Pitch Bend off, Legato off/Pitch Bend on, Legato on/Pitch Bend off, Legato on/Pitch Bend on)
- Pitch bend range: 5 positions (1, 2, 7, 12, 24 Semitones). For classical glissando and in order to have same note on audio and MIDI, use exactly same pitch bend range on your synth. Maximum setting possible is recomended.
- Volume trigger / Velocity sensitivity (how fast moves the volume loop's hand): 128 positions (0 to 127)
- Rod antenna MIDI CC: 5 positions (None, 8-Balance, 10-Pan, 16-Ribbon controler, 74-cutoff)
- Loop antenna MIDI CC: 8 positions (1-Modulation, 7-Volume, 11-Expression, 71-Resonnance, 74-Cutoff, 91-Reverb, 93-Chorus, 95-Phaser)
Default configuration is: Register = Lowest Register, Timbre = 1st Waveform, Channel = MIDI Channel 1, Rod antenna mode = Legato on/Pitch Bend on, Pitch bend range = 2 Semitones, Volume trigger = 0, Rod antenna MIDI CC = None, Loop antenna MIDI CC = 7-Volume.
MUTE BUTTON:
Sends ALL NOTE OFF on selected channel and stay in mute until it is pushed again.
Results:
As
long as you are inside pitch bend range you can play with the same
linearity as with device's sound (same pitch is audible on stable notes
without vibrato).
On 24 semitones wide pitch bend range capable
monophonic SW synth (tested with Gforce's Minimonsta), the effect is
rather good: We play on 4 octaves just like a normal theremin.
12 semitones capable synth are also good but sometime note transition can be heard.
SEE VIDEO:
HINTS and NOTES:
What can I do to get a theremin like glissando?
Activate picth bend and set pitch bend range of the theremin with a high value (12 semitones or 24 semitones). Set pitch bend range of the synth with the same value.
If
I do not trigger with the volume hand it also seems to trigger a new
tone with the pitch antenna. Guess this is how MIDI works.
When legato mode is activated, if you trigger a note (with volume loop) and go in one direction (with pitch antenna) a new note will be triggered at the limit of pitch bend range.
Legato mode is used as a workaround for a limitation of MIDI (max 24 semitones pitch bend). Maybe some synth can perform pitch bend on more that 2 octaves but none of mine does...
Tweakable parameters (in application.cpp):
Changing this to your taste may require some test and trial.
"#define VELOCITY_SENS 9" -> How easy it is to reach highest velocity (127). Something betwen 5 and 12.
"#define PLAYER_ACCURACY 0.2" -> Pitch accuracy of player.
Tolerance on note center for changing notes when playing legato. From 0
(very accurate players) to 0.5 (may generate note toggling).
Possible Human Machine Interface (HMI)
The picture at https://github.com/MrDham/OpenTheremin_V3_with_MIDI/blob/master/MIDI%20Open%20Theremin%20V3%20HMI.bmp
gives an example of possible HMI: on "Value" pot, red lines have 4
positions, grey lines have 5 positions and yellow lines have 8
positions. On "Parameter" pot you see coloured lines indicating which
colour to follow for the "Value" pot.
Percussive Sounds
The volume trigger can be configured so as we have some volume at note attack on percussive sounds.
The volume trigger setting is also used to set sensitivity for velocity (how fast left hand is moving when note is triggered).
Volume trigger = 127 (Maximum) won't generate any NOTE ON. It can be used to generate MIDI CC only.
Manipulation of MIDI CCs
Manipulation of "Rod antenna MIDI CC" and "Loop antenna MIDI CC" is not error proof. MIDI newbies should be advised to change their value in MUTE mode.
Added and removed compare to Open Theremin V3.
Serial communication implemented for program monitoring purpose was removed (Particularly during calibration). If you need to monitor calibration for antenna problem fixing, please use original master branch from https://github.com/GaudiLabs/OpenTheremin_V3.
Serial port is used to send MIDI messages now.
LICENSE:
Original project written by Urs Gaudenz, GaudiLabs, 2016 GNU license. This Project inherits this 2016 GNU License. Check LICENSE file for more information All text above must be included in any redistribution